First of all, I would like to clarify for those who have any confusion about Django and Django REST Framework:
Django is a full-featured web development framework, whereas Django REST Framework is an add-on for Django that makes developing RESTful APIs easy.
As such, if you’re wondering about how to connect Django REST Framework to PostgreSQL, what you really should be asking is how to connect Django to PostgreSQL and then build an API on top of it.
And that’s what we’re going to cover in this article.
What is PostgreSQL?
PostgreSQL is perhaps the most advanced and feature-rich open-source database solution available out there at the moment. No wonder it’s loved and used by millions of developers around the world.
The Django community is no different. In fact, PostgreSQL has the broadest feature support in Django amongst all the relational databases (such as MySQL, MariaDB, etc.)
How to connect Django (and Django REST Framework) to PostgreSQL?
Connecting a Django project with or without Django REST Framework to PostgreSQL is as easy as the following:
- Install PostgreSQL
- Create a database and a database user
- Create a Django project and install Psycopg 2 library (which handles PostgreSQL connections)
- Specify database connection details in Django settings
We will go over each step individually.
Pre-requisites and assumptions
To keep this article on the topic, I’m going to work off of a few assumptions:
- You have a basic understanding about Django
- You’re setting up a dev environment rather than production
- You have Python 3 installed on your system (3.6 or above)
- You have
pipinstalled and available in the command prompt - Optionally, you have
virtualenvorvenvinstalled, and you run all thepipcommands from within your virtual environment (it’s a good practice)
Step 1: Installing PostgreSQL
Installing PostgreSQL on Windows
Installing PostgreSQL on Windows is pretty straightforward.
Head to the download page on the EDB website (they host official installers for PostgreSQL) and get yourself the latest version.
Follow the installation wizard steps. You shouldn’t need to change the default options.
Along with installing PostgreSQL, the installer will create and start a Windows service to run it in the background. That means PostgreSQL will be up and ready immediately after the installation.
Installing PostgreSQL on Linux
On Linux, the installation process is pretty simple too.
It’s a good habit to refresh your packages index often, so start with that:
sudo apt updateThen, install the PostgreSQL package together with its contrib package for extra utilities:
sudo apt install postgresql postgresql-contribThe installation will create and start a service to run PostgreSQL in the background. It will also create a new user called postgres, which is the root user for the whole application.
To log in as the postgres user, run the following:
sudo -u postgres psqlThis will open PostgreSQL’s shell, where you can run SQL command, such as creating a database.
To exit the shell, you can run this command:
\qStep 2: Creating database and user
Creating PostgreSQL database and user on Windows
Along with PostgreSQL, the wizard should have installed pgAdmin, which is a user interface for managing databases. When you open it, it will ask you for the root user’s password.
Once logged in, you can expand the tree on the left until you see the “Databases” section. Right-click and create a new database.
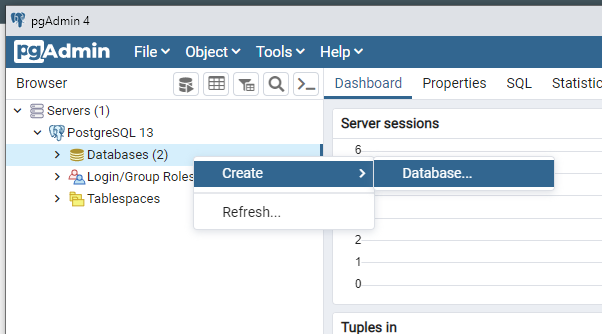
All you need to do is specify a name in the general tab. The other default options should be good enough.
Database user
You might also want to create a database user with limited rights for your Django app to use.
To do that, under the “Databases” section, right-click the “Login/Group Roles” section and add a new “Login/Group Role”.
In the general tab, specify a name.
In the definition tab, put in a password.
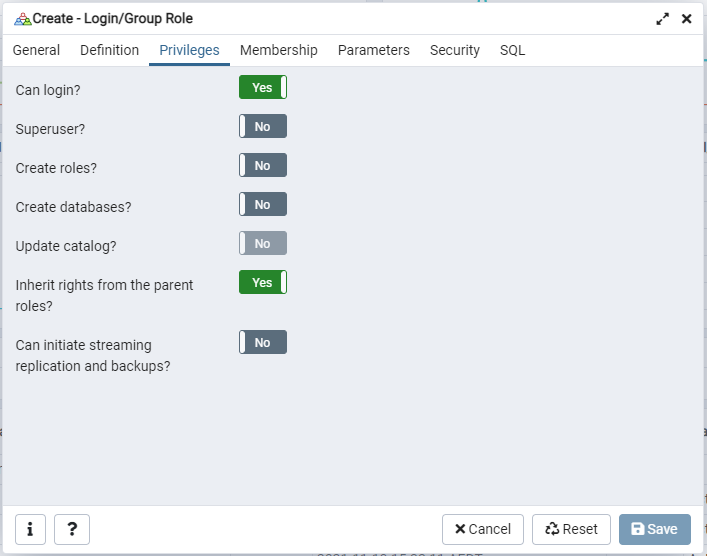
Next, switch to the privileges tab. Some options might not be very clear, so here is their meaning:
- Can login? – whether this is a user or a role (roles can’t login) – YES
- Superuser? – whether this user/role has all possible privileges – NO
- Create roles? – whether the user create new roles; we don’t need that for regular database access – NO
- Create databases? – self-explanatory, we don’t need it – NO
- Update catalog? – whether the user can update system stores schema metadata (internal stuff); only available to superusers, but we don’t need it – NO
- Inherit rights from the parent roles? – applies only if our user has a parent user/role, but you can leave it on – YES
- Can initiate streaming replications and backups? – these are advanced features, and again, we don’t need them for regular database access – NO
Creating PostgreSQL database and user on Linux
Creating a database and a user is even faster on Linux since we can use the command prompt.
We will need to open the psql shell like it was mentioned earlier. Here’s a reminder on how to do it:
sudo -u postgres psqlIn the PostgreSQL shell you create a new database like so:
create database dbname;Note the semicolon ; at the end – it’s important.
Create a new user with a password with the following command:
create user username with encrypted password 'password';Note the password is enclosed in single quotes.
Lastly, give the user all privileges on the database:
grant all privileges on database dbname to username;Done!
Step 3: Setting up Django with dependencies
The next step is to install Django with all the dependencies inside our virtual environment.
Some time ago I created this installation cheat sheet for a Django project with Django REST Framework. It has all the commands and settings configurations you should need to start a new project.
Whether you’ve followed the cheat sheet or not, you’ll need to run the command below. If you did, it will only install the package that handles PostgreSQL connections. If you didn’t, it will install all the packages required for this project:
pip install -U django psycopg2-binary djangorestframeworkAnd if you haven’t yet, create a new Django project with the following:
python -m django startproject myproject .Note the dot . at the end – it instructs the command to create the project files in the current folder instead of a new folder.
Step 4: Configuring database access in Django settings
Open the settings.py file from the Django project you’ve just created and update the DATABASES section using the database and user details you created earlier:
DATABASES = {
    'default': {
        'ENGINE': 'django.db.backends.postgresql_psycopg2',
        'NAME': '<db-name>',
        'USER': '<db-user>',
        'PASSWORD': '<db-password>',
        'HOST': '127.0.0.1',
        'PORT': '5432',
    }
}
One easy way to test whether we have database access is to run Django’s initial migrations:
python manage.py migrateIf you see the list of applied migrations, then your database is up and ready to use.
Building a simple Django REST Framework API with PostgreSQL
For the sake of example, let’s build a very simple API with Django REST Framework. Its only function will be managing notes.
NOTE: For more details or clarifications, you can see the full source code of this API project on GitHub.
Start a new app to keep things organized:
python manage.py startapp notesAnd register it in the INSTALLED_APPS of the settings.py file. Don’t forget to register Django REST Framework there too.
INSTALLED_APPS = [
    ... # Django apps are here
    'rest_framework',
    'notes.apps.NotesConfig',
]
Creating a simple model
Inside the models.py file of the notes app, add the following code:
from django.db import models

class Note(models.Model):
    text = models.TextField()
Now open the command prompt to generate and run the migration:
python manage.py makemigrations
python manage.py migrate
Creating DRF serializers
Next, we need to create a serializer for our model.
For those who don’t know, serializers are part of Django REST Framework; they are a special class that helps convert Django model instances into JSON and back.
It’s a good idea to keep serializers in a separate file. Create a new file called serializers.py inside the notes app folder and add the following code to it:
from rest_framework import serializers
from .models import Note

class NoteSerializer(serializers.ModelSerializer):
    class Meta:
        model = Note
fields = '__all__'NOTE: Normally, I would create a separate app for the API because it's a good practice to keep an app for a single purpose only. But for the sake of simplicity, I'll keep API files in the same folder for this project.
Creating DRF API views
Serializers help convert data to and from JSON, but somehow we have to pass that data to them in the first place. This is where views come into play.
As you might know, views in Django handle the logic of incoming HTTP requests and generate responses to them.
Django REST Framework provides a subset of views called API views. They’re designed specifically for creating API endpoints. Under the hood, they implement several features that make this process easier.
For our API, we want to be able to perform all of the CRUD operations (Create, Read, Update, Delete) on the notes. We will need a view for each operation.
Luckily for us, DRF provides a special class called ModelViewSet. Think of it as if four API views (one for each of the CRUD operations) were bundled together in one class.
NOTE: In fact, there are five views in a viewset because DRF supports full and partial updates. Partial updates are handy when you want to update one or a few fields of a model instance. Instead of sending the entire data, you only send a selection of fields, which is faster.
Open up the views.py file of your app and add the following code:
from rest_framework import viewsets
from .models import Note
from .serializers import NoteSerializer

class NoteViewSet(viewsets.ModelViewSet):
    serializer_class = NoteSerializer
    queryset = Note.objects.all()
Note how we only need to specify the serializer and a queryset for our viewset to work. The rest is handled by DRF internally. Isn’t that powerful?
Registering API URLs
Great. We have the views now, but we somehow need to call those views when a particular URL is requested. In our case, it would be something like this:
http://domain.name/api/notes/As you probably know, the file called urls.py is responsible for registering all views in Django.
However, because our views are bundled together, we cannot register them the usual way. We need to “unpack” them first. For that, Django REST Framework provides a special tool called a router.
Here is how to instantiate a router and register our viewset in it (inside the urls.py file):
... # Other imports are here
from django.urls import path, include  # Ensure `include` is imported
from rest_framework import routers
from notes.views import NoteViewSet

# Notes router
notes_router = routers.SimpleRouter()
notes_router.register(
    r'notes',
    NoteViewSet,
    basename='note',
)

... # urlpatterns code is here
And now we can add the URLs from our router to the urlpatterns list. Here is how to do it:
urlpatterns = [
    ... # Admin routes are registered here

    # API
    path('api/', include(notes_router.urls))
]
Testing the API
You should be all set. Let’s do a quick test to ensure our API works as expected. Start the Django server:
python manage.py runserverThen, navigate to http://127.0.0.1:8000/api/notes/. You should see the user interface showing an empty list of notes and offering to post one like in the screenshot below:
Give it a try! You can try all four of the CRUD operations thanks to this UI that DRF provides called Browsable API.
Conclusion
As you can see, making Django work with PostgreSQL is super easy.
As for Django REST Framework, it’s designed to be database-agnostic. So if you have two Django projects with the exact same models but different databases, the code of serializers and API views for those models can be the same.
There are, of course, exceptions to that rule – for example, if you’re using MongoDB with MongoEngine. But that is a whole different topic.
To see the full source code of the API project, check out its GitHub repository.