MongoDB has gained significant attention from the dev community over the last decade. All Thanks to its exceptional flexibility and high scalability.
As a long-term fan of Django and Django REST Framework, I got curious about how MongoDB can be used for building APIs.
So I did my research on how to make Django speak with MongoDB, which I will cover in this article, but here is a quick summary:
There are two main tools for Django to work with MongoDB: Djongo and MongoEngine.
Djongo is a MongoDB database engine for Django. It is still under development but has a significant advantage – it allows you to use Django’s native ORM.
MongoEngine, on the other hand, is an independent library that introduces its own ORM (actually ODM – more on that later). It’s very robust, but you have to use it in place of Django’s ORM, which comes at a price.
Depending on your goals, either one can be a good choice. But if you’re working on a simple project or just learning MongoDB, I’d say go with Djongo – it will save you quite a bit of trouble.
To help you make an informed decision, I will cover each tool in greater detail. I will also build a simple API with Django REST Framework to show each one in action.
What is Djongo?
As its official GitHub states, Djongo is the only connector that lets you use Django with MongoDB without changing the Django ORM.
Under the hood, Djongo translates SQL queries generated by Django into MongoDB queries – that’s how it manages to preserve the ORM.
Preserving the native ORM provides several advantages:
- You can keep using the Django models API you’re used to, or even migrate an existing project from SQL to a NoSQL database
- Django’s core modules, like user authentication and permissions, session and admin panel, work just fine
- Any third-party packages relying on Django’s ORM should just work too

But be aware that while Djongo appears pretty stable, it’s still a work-in-progress.
So if you plan to work on a big, long-term project, you are likely to run into unexpected issues at some point because complex projects often require unordinary solutions.
Check out open issues on GitHub to get a better picture of where things are.
There’s also a paid version available called DjongoCS, which offers customer support, but it’s beyond the scope of this article.
What is MongoEngine?
According to the official GitHub, MongoEngine is a Python Object-Document Mapper for working with MongoDB. It’s very similar to Django’s ORM (in fact, even its API has a lot of resemblances) but for a document-oriented database (hence the name ODM)
It’s actively developed, has a big community, and has integrations for various frameworks, such as Flask. So overall, MongoEngine is a pretty robust solution.
But MongoEngine’s main drawback in regards to Django is the very thing it does. Because you have to use MongoEngine’s own ODM, you can expect several issues:
- Django’s core modules, such as sessions, user authentication and permissions, admin panel, etc. won’t work out of the box
- The same goes for any third-party packages relying on Django’s ORM
- If you migrate an existing project from SQL to a NoSQL database, all models have to be recreated
There has been an attempt to address Django’s core modules, but it looks like that integration is still a bit raw.
As you’ve probably guessed, you may find yourself rebuilding a lot of the stuff that otherwise would have been covered by existing packages.
So if your project is relatively complex and requires a non-relational database, perhaps you should ask yourself whether Django (and Django REST Framework) is a good choice in the first place.
Building DRF API with MongoDB using Djongo
Now let’s dive into some coding examples. How about we build a simple API for a URL shortener (kind of like Bitly)?
If you are starting a new project, check out this installation cheat sheet for a DRF project. It should get you up to speed.
As for our API with Djongo, let’s create a separate app for it to keep things organized:
python manage.py startapp djongo_appInstalling Djongo
To add Djongo and its dependencies to your project, run the following:
pip install -U djongo pymongo[srv]Note that we need Pymongo with SRV extension as a dependency to support connection over mongodb+srv protocol.
Creating a MongoDB instance
We will need a MongoDB instance to store our data. Head over to the MongoDB website and create an account if you haven’t got one.
The free plan is more than enough for our project and is a perfect way to learn MongoDB.
The process is pretty straightforward, and the UI shows tips on how and what to do next, so I won’t list the steps here. But if you need help, leave your question in the comments below, and I’ll help out.
Configuring MongoDB access with Djongo
Once you’ve created a cluster with a database, MongoDB will offer you to create a database user.
With the user set up, you can navigate to the databases section, click the “Connect” button against your database, and select the “Connect your application” option from the pop-up (see the screenshots below).


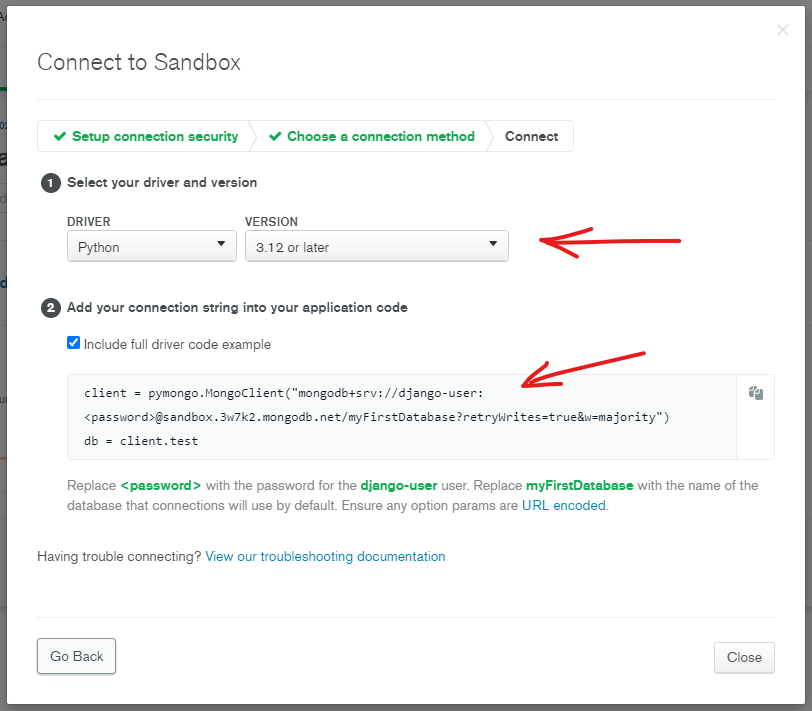
That should give you the connection string, which we will add to the DATABASE section in our settings.py file:
DATABASES = {
    'default':
        {
            'ENGINE': 'djongo',
            'NAME': '<database-name>',
            'CLIENT':
                {
                    'host':
                        'mongodb+srv://<mongodb-user>:<password>'
                        '@<mongodb-host>/<database-name>'
                        '?retryWrites=true&w=majority'
                }
        }
}
Just replace the placeholders from the snippet above with your actual connection string details and voila – you’re done!
Creating basic models
We will need to add a couple of models for our URL shortener to the models.py file. The first one is Account – let’s keep it very basic:
# Note that we're importing models from `djongo`
from djongo import models

class Account(models.Model):
    email = models.EmailField()
Note that instead of importing models from django.db, we are importing from djongo. That’s because Djongo provides a few additional fields specifically for MongoDB.
The other model is ShortLink:
... # Account declaration is here

class ShortLink(models.Model):
    # FK into Account to define ownership
    account = models.ForeignKey(
        Account,
        on_delete=models.CASCADE,
        related_name='short_links',
    )
    # Where this short link will redirect to
    redirect_to = models.URLField()
As you can see, field declaration is identical to how you would do it natively. Neat, right?
Writing the logic to shorten URLs
For shortened URLs, we are looking for two properties:
- They must be short, and
- They must be unique
Luckily for us, Django’s utils.crypto contains a function called get_random_string. As the name suggests, it generates unique random strings.
Since we will use these random strings to search short links in the database (to redirect users to another website), it makes sense to keep them as a primary key for our model. That way, they will be indexed, and therefore searching for them will be much faster.
So let’s override the id field on our ShortLink model:
... # Other imports are here
from django.utils.crypto import get_random_string

... # Account declaration is here

class ShortLink(models.Model):
    id = models.CharField(
        primary_key=True,
        max_length=12,
        default=get_random_string,
    )
    ... # The rest of ShortLink fields are here
Applying database migrations
Lastly, generate and run the migrations. It will allow Djongo to create collections inside your MongoDB and set up all necessary indexes:
python manage.py makemigrations
python manage.py migrate
Like I mentioned at the start of the article, Djongo is still under development. So as you run the migrations, you will see a bunch of warnings, such as:
This version of djongo does not support "NULL, NOT NULL column validation check" fully
This version of djongo does not support "schema validation using CONSTRAINT" fully
This version of djongo does not support "schema validation using KEY" fully
...
I’m not entirely sure what exactly isn’t supported. From my testing, the API and the admin panel worked fine. I didn’t notice any issues.
But that’s just another sign for you to plan your stack carefully if you’re working on an actual, complex project.
Declaring DRF serializers
Let’s assume we need two endpoints for our API:
- One to create and manage accounts
- And another to manage short links, which will be a nested endpoint under accounts
Inside the djongo_app folder, create a new file called serializers.py.
NOTE: Normally, I would create a separate app for the API because it's a good practice to keep an app for a single purpose only. But for the sake of simplicity, I'll keep API files in the same folder for this project.
Inside the serializers.py let’s add a couple of serializers for our models:
from rest_framework.serializers import ModelSerializer
from .models import Account, ShortLink

class AccountSerializer(ModelSerializer):
    class Meta:
        model = Account
        fields = '__all__'

class ShortLinkSerializer(ModelSerializer):
    class Meta:
        model = ShortLink
        fields = '__all__'
        extra_kwargs = {
            'id': {'read_only': True},
            'account': {'read_only': True}
        }
Note the extra_kwargs definition in the Meta class of ShortLinkSerializer. Both the id and account fields will be set behind the scenes, so we mark them as read_only.
Declaring DRF API views
Let’s create another file api_views.py in the djongo_app folder and declare some views. The first one is for our accounts:
from rest_framework.generics import get_object_or_404
from rest_framework.viewsets import ModelViewSet
from .models import Account, ShortLink
from .serializers import AccountSerializer, ShortLinkSerializer

class AccountViewSet(ModelViewSet):
    ''' ViewSet to manage accounts. '''
    serializer_class = AccountSerializer
    queryset = Account.objects.all()
The other one is for short links. It’s slightly more complicated because we want it as a nested resource. The end URL for it will look like this:
https://domain.name/api/accounts/1/links/Start by declaring the serializer class itself:
... # AccountViewSet code is here

class ShortLinkViewSet(ModelViewSet):
    ''' ViewSet to manage short links under an account. '''
    serializer_class = ShortLinkSerializer
Since the account PK will be captured in the endpoint’s URL, it will be available in the kwargs of our viewset. So the method to look up the account will look like this:
... # ShortLinkViewSet serializer declaration is here

    def look_up_account(self):
        # Check account pk in kwargs before looking it up
        # so that swagger view calls don't throw errors
        if account_pk := self.kwargs.get('account_pk'):
            return get_object_or_404(Account, pk=account_pk)

        # Real calls cannot be made without account PK in the URL
        # so returning None here is safe
        return None
If the account doesn’t exist, the 404 error will be returned thanks to the get_object_or_404 method.
Now we can override the get_queryset method to pre-filter short links queryset by the account:
    ... # look_up_account declaration is here

    def get_queryset(self):
        return ShortLink.objects.filter(account=self.look_up_account())
This should take care of the RUD operations from the CRUD set, but we still need to handle short link creation.
Remember how I said earlier that the reference to the account would be set in the background? Let’s override the perform_create method of our viewset to do this job for us:
    ... # get_queryset declaration is here

    def perform_create(self, serializer):
        account = self.look_up_account()  # 404 if no account
        # Set short link owner in the `validated_data`
        serializer.validated_data['account'] = account
        super().perform_create(serializer)
Registering API endpoints
Finally, we need to register our API resources inside the urls.py file of the project. But because we are using a viewset for the short links endpoint and want it to be nested, we will need an extra package that facilitates that.
Run the following to install the DRF Nested Routers package:
pip install -U drf-nested-routersAnd now we can register the endpoints. So inside the urls.py instantiate the routers:
... # Other imports are here
from django.urls import path, include  # Ensure these 2 are imported
from rest_framework_nested import routers
from djongo_app.api_views import (
    AccountViewSet as DjongoAccountViewSet,
    ShortLinkViewSet as DjongoAccountShortLinkViewSet,
)

# Init Djongo API routers
djongo_router = routers.SimpleRouter()
djongo_router.register(
    r'accounts',
    DjongoAccountViewSet,
    basename='account',
)
# Use DRF nested routers
djongo_links_router = routers.NestedSimpleRouter(
    djongo_router,
    r'accounts',
    lookup='account',
)
djongo_links_router.register(
    r'links',
    DjongoAccountShortLinkViewSet,
    basename='account-link',
)
Then add them to the urlpatterns list:
... # Routers are declared here

# Declare urlpatterns
urlpatterns = [
    ... # Other links are declared here

    # Djongo API
    path('djongo-api/', include(djongo_router.urls)),
    path('djongo-api/', include(djongo_links_router.urls)),
]
The GitHub repo for this example project also contains a view that handles the redirects to external websites, but I’ll skip it in this article.
Building DRF API with MongoDB using MongoEngine
Now let’s build the same simple URL shortener app but with MongoEngine this time.
Similarly, I will create a new Django app to keep things organized:
python manage.py startapp mongoengine_appInstalling MongoEngine
We will need two packages to make our app work: MongoEngine itself and DRF-MongoEngine, which allows DRF to work with MongoEngine’s models:
pip install -U mongoengine django-rest-framework-mongoengine pymongo[srv]Now, this is another caveat of the MongoEngine approach – the DRF-MongoEngine package hasn’t been updated for several years.
While it still works fine, you might run into some issues down the track and will have to fix them yourself. So bear that in mind.
Creating a MongoDB instance
If you followed the section about setting up an app with Djongo, then you already have a database and don’t need to create another one.
If you entirely skipped the section about Djongo, then at this point, you need to go to the MongoDB website, open a free account and create a database cluster. The process is pretty straightforward, so I don’t see a need to break it down here.
Configuring MongoDB access with Djongo
If you don’t have the connection string to your database, take a look at this section.
Otherwise, open the settings.py file and add the following anywhere you like (I added it right after the DATABASES declaration):
... # Other imports are here
import mongoengine

... # Other settings are here

# Connect with MongoEngine
mongoengine.connect(
    host='mongodb+srv://<mongodb-user>:<password>'
    '@<mongodb-host>/<database-name>'
    '?retryWrites=true&w=majority',
    connect=False,
)
This will allow MongoEngine to establish a connection with your database upon the server start.
Creating basic models
Models are going to be similar, but here are a few key differences:
- We will import
mongoengineinstead ofdjango.db.models - We will use
mongoengine.Documentinstead of Django’smodels.Model - We will use MongoEngine’s fields instead of Django’s fields
- There is no built-in function in MongoDB to create autoincremented IDs, nor they are necessary, so we will use unique strings generated by
get_random_stringas IDs for both models
With the last point in mind, let’s create an abstract model to declare just the ID. Inside the models.py of the new app add the following:
import mongoengine
from django.utils.crypto import get_random_string
from .apps import MongoengineAppConfig

class RandomStringPKDocument(mongoengine.Document):
    id = mongoengine.StringField(
        primary_key=True,
        max_length=12,
        default=get_random_string,
    )

    # Meta abstract
    meta = {'abstract': True}
Note how the meta is not a class (as it usually is in Django) but a property. This is another difference from Django ORM’s API.
Now we can add models for the account and short link:
... # RandomStringPKDocument declared here

class Account(RandomStringPKDocument):
    email = mongoengine.EmailField(required=True, unique=True)

    # Meta collection name
    meta = {'collection': f'{MongoengineAppConfig.name}_account'}

class ShortLink(RandomStringPKDocument):
    account = mongoengine.ReferenceField(
        Account,
        required=True,
        reverse_delete_rule=mongoengine.CASCADE,
    )
    redirect_to = mongoengine.URLField(required=True)

    # Meta collection name
    meta = {'collection': f'{MongoengineAppConfig.name}_shortlink'}
Note that in the meta I specified collection names. By default, MongoEngine will name the collection for a model using the snake case version of its name, and without any prefixes. To keep things more consistent with Django, I added the prefixes manually.
Writing the logic to shorten URLs
For those who skipped the Djongo section entirely, you can check out this part, which explains how unique random strings are generated. We already have it covered.
Declaring DRF serializers
Serializers are going to be almost the same as for Djongo, but with the following differences:
- We will import and use
DocumentSerializerfromrest_framework_mongoengine.serializersinstead of DRF’s serializers - We will need to make ID field read-only on both serializers explicitly
Create a new file called serializers.py inside the mongoengine_app folder and add the following:
from rest_framework_mongoengine.serializers import DocumentSerializer
from .models import Account, ShortLink

class AccountSerializer(DocumentSerializer):
    class Meta:
        model = Account
        fields = '__all__'
        extra_kwargs = {'id': {'read_only': True}}

class ShortLinkSerializer(DocumentSerializer):
    class Meta:
        model = ShortLink
        fields = '__all__'
        extra_kwargs = {
            'id': {'read_only': True},
            'account': {'read_only': True}
        }
Declaring DRF API views
We will also need a file called api_views.py to store our API views. We will import DRF-MongoEngine’s views since they’re able to work with MongoEngine’s documents.
Here’s how the code for both serializers looks:
from rest_framework_mongoengine.generics import get_object_or_404
from rest_framework_mongoengine.viewsets import ModelViewSet
from .models import Account, ShortLink
from .serializers import AccountSerializer, ShortLinkSerializer

class AccountViewSet(ModelViewSet):
    ''' ViewSet to manage accounts. '''
    serializer_class = AccountSerializer
    queryset = Account.objects.all()

class AccountShortLinkViewSet(ModelViewSet):
    ''' ViewSet to manage short links under an account. '''
    serializer_class = ShortLinkSerializer

    def look_up_account(self):
        # Check account pk in kwargs before looking it up
        # so that swagger view calls don't throw errors.
        # NOTE: using `account_id` instead of `account_pk` here
        # because of how rest_framework_mongoengine handles routes
        if account_pk := self.kwargs.get('account_id'):
            # NOTE: passsing `Account.objects` here because the overridden
            # get_object_or_404 accepts a queryset instead of model
            result = get_object_or_404(Account.objects, pk=account_pk)
            return result

        # Real calls cannot be made without account PK in the URL
        # so returning None here is safe
        return None

    def get_queryset(self):
        return ShortLink.objects(account=self.look_up_account())

    def perform_create(self, serializer):
        account = self.look_up_account()
        serializer.validated_data['account'] = account
        super().perform_create(serializer)
Note that we also use DRF-MongoEngine’s get_object_or_404 method because it handles MongoEngine’s validation errors. You will also need to use it for standard Django views (i.e. not DRF views) if you create any.
Registering API endpoints
Lastly, we can add the endpoints to the urls.py file. Again, if you followed the Djongo section, you already know how to do it. The process is the same.
If you skipped the Djongo section completely, check out this part, which explains how to install an extra package we need.
The full code to register our routers is this:
... # Other imports are here
from django.urls import path, include  # Ensure these 2 are imported
from rest_framework_nested import routers  # Ensure nested routers are imported
from mongoengine_app.api_views import (
    AccountViewSet as MEAccountViewSet,
    AccountShortLinkViewSet as MEAccountShortLinkViewSet,
)

... # Djongo routers are declared here

# Init MongoEngine API routers
mongoengine_router = routers.SimpleRouter()
mongoengine_router.register(
    r'accounts',
    MEAccountViewSet,
    basename='account',
)
# Use DRF nested routers
mongoengine_links_router = routers.NestedSimpleRouter(
    mongoengine_router,
    r'accounts',
    lookup='account',
)
mongoengine_links_router.register(
    r'links',
    MEAccountShortLinkViewSet,
    basename='account-link',
)

# Declare urlpatterns
urlpatterns = [
    ... # Other routes are registered here (including Djongo API)

    # MongoEngine API
    path('mongoengine-api/', include(mongoengine_router.urls)),
    path('mongoengine-api/', include(mongoengine_links_router.urls)),
]
The GitHub repo of this example project also has a Django standard view that handles redirects from short links. Check it out for the details if you like.
Conclusion
As you can see, there is still no perfect solution to integrate Django with MongoDB at this stage.
Djongo looks very promising and is far easier to use. It’s being actively developed, so maybe it will become the de-facto MongoDB engine for Django in the future. But is it ready for production right now? I will leave it up to you to decide.
MongoEngine is solid but brings a lot of disruption to Django’s workflow, to the point where you lose most of the core functionality. So I suppose it’s only a good choice if you want to learn MongoEngine itself (e.g. to be able to use it with other frameworks in the future) or if you don’t plan to use Django’s core functions in your project.
What are your thoughts on this? Share them in the comments!