There is a good chance that you have come across a need to customize your API’s functionality in your previous or current project. Perhaps you had to validate a field conditionally or show/hide several fields based on the user type? Or maybe you needed to implement user permissions on an object level?
Most of the time, custom solutions require stepping away from the conventional implementations (i.e. using basic inheritance and overriding a few properties).
That’s when understanding what happens inside DRF when a user requests a URL becomes invaluable. It helps approach tasks effectively, know which methods to override, and how to debug uncertain issues.
Usually, I try to summarize the answer at the beginning of an article to save you time, but this one requires a special approach. So I made this diagram (I love visual stuff) that represents the process on a high level.
DRF Request-Response Cycle diagram
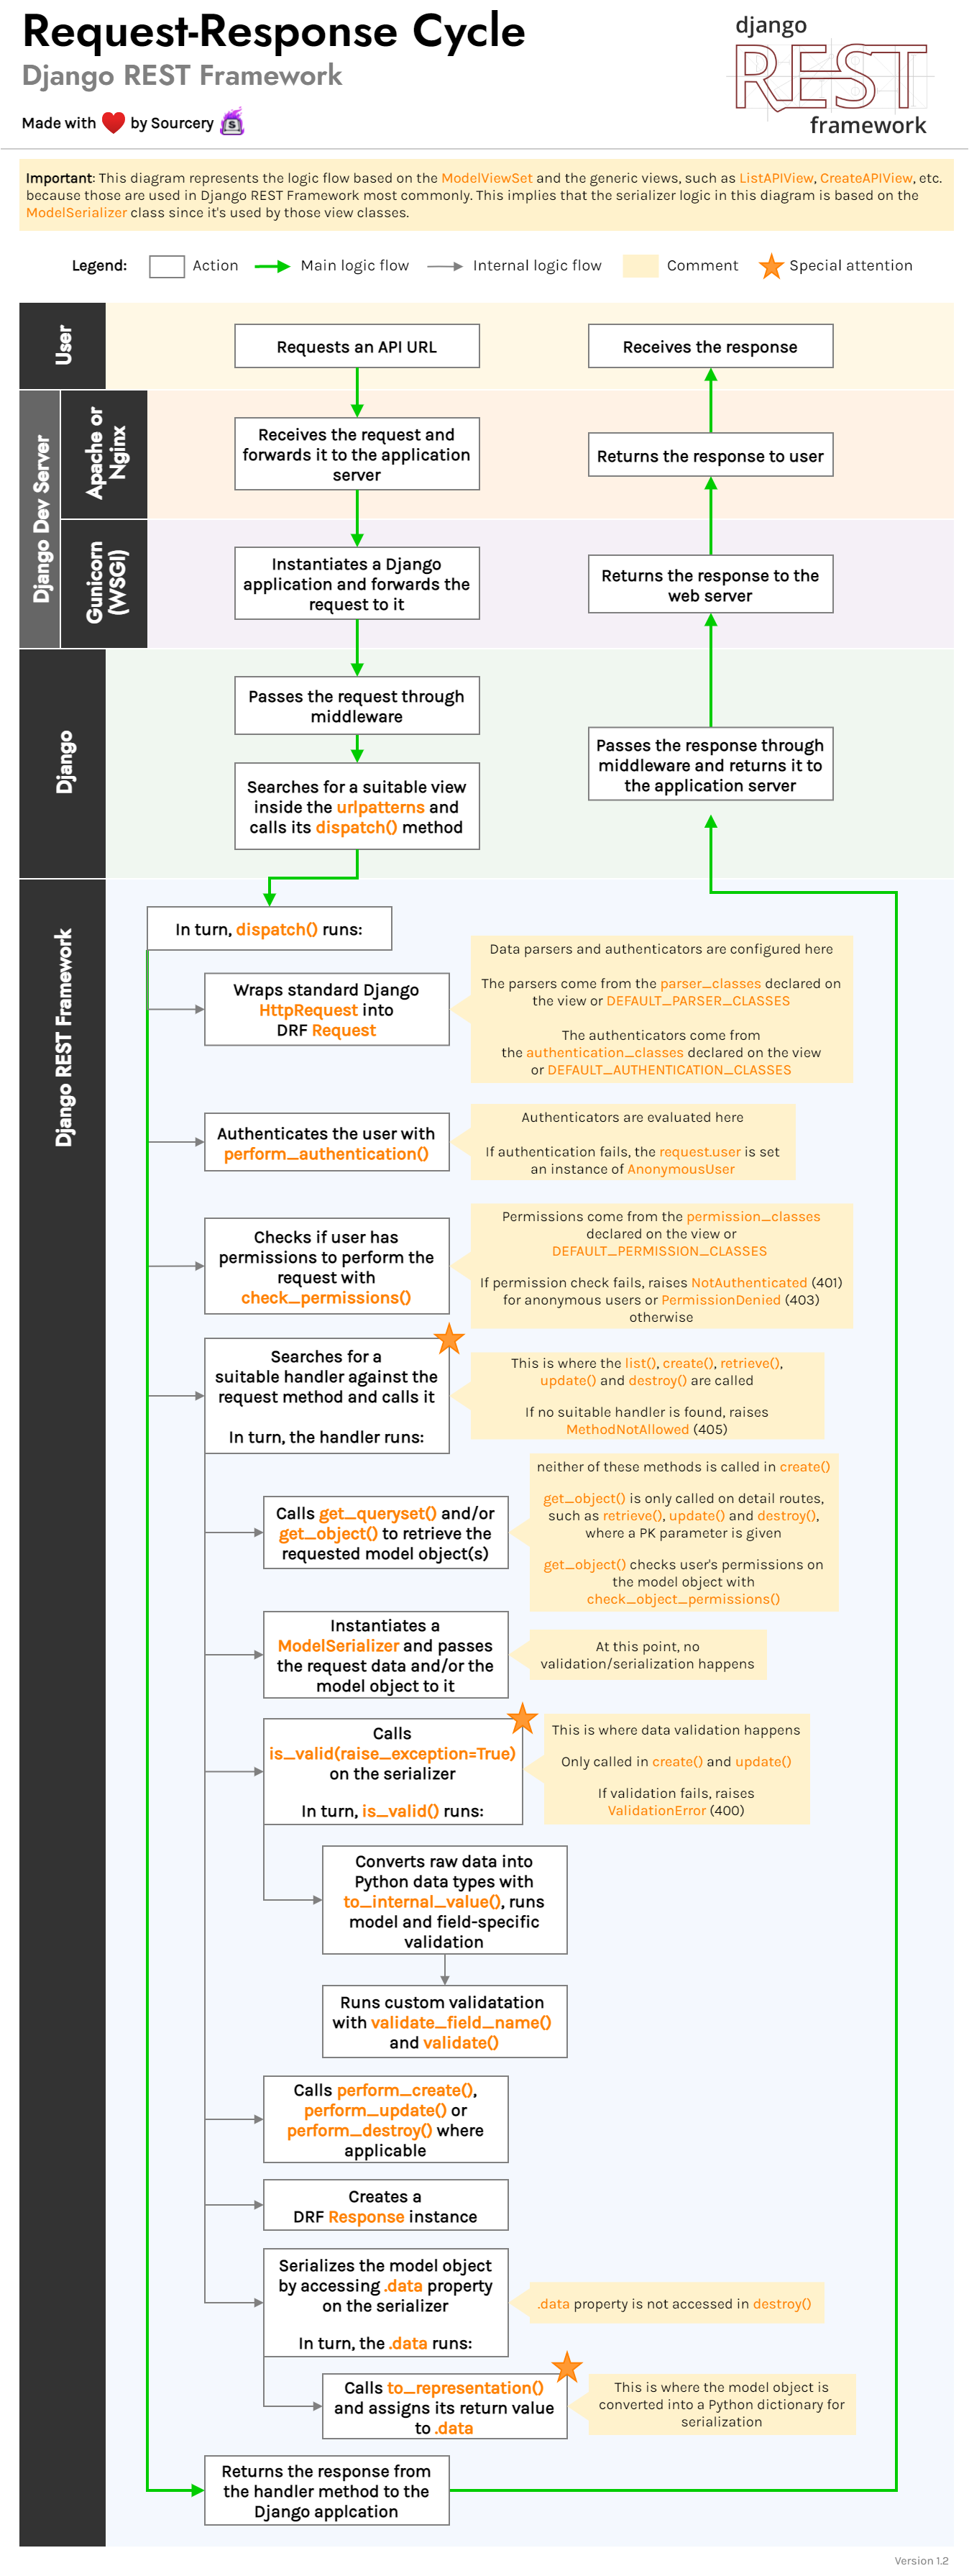
Obviously, it’s impossible to put everything into a diagram without making it look like a rocket blueprint. So I omitted certain parts that you are unlikely to ever override and focused on the key moments you’re most likely to customize.
I also included very simplified steps that happen before and after the request enters and leaves DRF to complete the cycle.
Keep in mind that in this article we review the logic flow based on the ModelViewSet and the generic views, such as ListAPIView, CreateAPIView, etc. because people use them most commonly. Hence the serializer logic is based on the ModelSerializer class since it’s used by those view classes.
NOTE: Even if you are building your custom classes on top of a regularAPIView,GenericAPIViewor the basicSerializer, you should try to reuse the code from their descending classes whenever possible, as they offer robust implementations and good programming practices.
Now let’s go over the process with some additional details.
What happens before user request reaches DRF
If you are curious, there are some good articles out there describing how Django handles requests and responses, for example:
- Django Request-Response Cycle – An easy to follow guide on Data Flair
- Django: Request/Response Cycle on Medium
But since our focus is Django REST Framework I will just summarize what happens on the outside:
- It starts with the user requesting an API URL.
- The web server (e.g. Apache or Nginx) receives the request and forwards it to the application server.
- The application server (e.g. WSGI, and most of the time, Gunicorn) instantiates a Django application and forwards the request to it.
- Django passes the request through its middleware.
- Django searches for a suitable view against the registered routes. This is where the urlpatterns from our urls.py file come into play.
- If a suitable view is found, Django calls its
dispatch()method and passes the request object to it as an argument. The dispatch method does all the magic, as you’ve seen from the diagram. - If no suitable view exists, the Django application returns a 404 error.
What happens inside DRF during request, step-by-step
Since this process is fairly detailed, I felt like breaking it into steps would make sense.
Step 1: Request initialized
The dispatch() method wraps the standard Django HttpRequest into DRF’s special Request object.
DRF’s Request object accepts a list of parsers and a list of authenticators as arguments, so this is where those are configured.
The parsers come from the parser_classes declared on the view or the DEFAULT_PARSER_CLASSES defined in the settings. The DRF request parses data lazily, i.e. it evaluates the parsers only when its .data, .POST and .FILES properties are accessed.
The authenticators come from the authentication_classes declared on the view or the DEFAULT_AUTHENTICATION_CLASSES defined in the settings. Similarly, the DRF request authenticates the user lazily, i.e. only when its .user property is accessed.
Step 2: User authenticated
The dispatch() method attempts to authenticate the user by calling the perform_authentication() method.
Under the hood, it simply calls request.user mentioned above.
The underlying logic loops over each authentication class and tries to identify the user. If none of them succeeds, the user is set as an AnonymousUser instance.
Step 3: Permissions checked
The dispatch() method checks the user’s permissions by calling the check_permissions() method.
This is where the permission_classes declared on the view or the DEFAULT_PERMISSION_CLASSES defined in the settings are evaluated.
Permission classes usually look at the request method, i.e. GET, POST, DELETE, etc., and determine whether the user has the right to request it. Respectively, they return True or False.
If any of the permission classes return False, the check_permissions() method raises one of the two exceptions:
NotAuthenticatedexception (401) for anonymous usersPermissionDeniedexception (403) in all other cases
Whenever an exception is raised, dispatch() catches it, wraps it into a Response instance, and passes it up the stream. Eventually, it’s shown to the user as an error response.
Step 4: Handler selected
The dispatch() method searches for an appropriate handler for the request method.
This is where the list(), create(), retrieve(), update() and destroy() handlers are called, i.e. those that you are most likely to override
If no suitable handler is found, dispatch() raises the MethodNotAllowed exception (405).
Step 5: Queryset or object retrieved
The handler method calls the get_queryset() and/or the get_object() method(s) to retrieve the requested model object(s).
Note that neither of those methods is called in create() because they are not needed to create new objects.
Also, note that the get_object() method is only called on detail routes, such as retrieve(), update() and destroy(), where a PK parameter is given.
Lastly, you should know that get_object() also checks user’s permissions on the object by calling the check_object_permissions() method.
Step 6: Serializer instantiated
The handler instantiates the ModelSerializer class and passes the request data and/or the model object to it. At this point, no validation or serialization happens because DRF does those lazily.
Step 7: Validation is run
The handler calls the is_valid(raise_exception=True) method on the serializer. Note that it’s only called in create(), update() and partial_update(), since other actions don’t take any incoming data.
Inside the is_valid() method a few things happen:
- Raw data is converted into Python data types with the help of the
to_internal_value()method, which also runs the model and field validation. If an errors occur on a field (e.g. a required field is empty), an exception will be raised and its custom validation won’t be run. - Once a field data is converted, the logic checks whether a custom validation method exists and runs it if so. This is where your custom methods named like
validate_field_name()come into play. - Lastly, the logic runs the overall custom validation method
validate().
NOTE: to_internal_value() is often the method to override when you need to customise how your data is converted into Python or if you need to implement more sophisticated validation. Be careful, though; this is a sensitive method!
Since the handler passes raise_exception=True to is_valid(), it will raise the ValidationError exception (400) if validation fails.
As you probably know, is_valid() is smart enough to run validation on all fields prior to raising an exception, so that the user can receive multiple error messages at once.
Step 8: Request action performed
The handler method calls perform_create(), perform_update() or perform_destroy() depending on the type of request method. This is where the database query happens.
This step only happens in the respective handlers.
Step 9: Response generated
Lastly, the handler method creates a DRF Response instance.
All handlers except for destroy() return a representation of the model object(s). That means the object(s) needs to be serialized, converted into JSON or other formats.
For that, the handler accesses the .data property on the serializer. In turn, it calls the to_representation() method, which converts the model object(s) into a Python collection (i.e. dict or list).
Later in the cycle, this Python collection will be passed to the renderer classes, which will serialize it into a required format.
NOTE: Remember that to_representation() is often the method to override if you need to customize the representation of your model object(s), for example, to conditionally hide some of the fields.
What happens after DRF returns a response
Internally, the DRF’s response object converts the Python collection into whichever format(s) defined by the renderer_classes on the view or the DEFAULT_RENDERER_CLASSES defined in the settings. Most of the time, it’s JSON.
The response is then passed up the stream and goes through the same steps it went at the start but in reverse order. That is:
- Django passes the response through middleware, then returns to the application server
- The application server (e.g. Gunicorn) passes it to the web server (e.g. Apache or Nginx)
- The web server sends the response back to the user
Conclusion
As you can see, the Request-Response Cycle in Django REST Framework is not overly complex. It has several entry points you’re likely to customize depending on your needs, but the rest can stay unchanged. That’s a sign of excellent architecture!
Now that you know how DRF works, you might feel as cool as this doggo:

As always, I’m keen to hear your thoughts and improve this article and diagram, so be sure to leave a comment!